
In the last part you were introduced to Google Forms, and learned the basics of the two different screens. Now you are about to be guided through the creation of your first Google Form. This chapter will teach you how to create a form that can be used to collect basic student information. In the first section of this chapter, you will familiarize yourself with the form screen. In the second section you will learn how to title your form, how to add a description, and how to add multiple choice and how to add a short answer question.
The third section of this chapter will teach you more advanced features such as adding titles, adding images, and adding a second section. By the time you have finished this chapter you will be well on your way to creating Google Forms for use with your students, and co-workers.
Note: This tutorial was made to highlight Google Forms use at the Toronto District School Board, so there are a number of specific references to @tdsb email addresses, and services. That you may be operating through a different organization will not have any impact on this tutorial, aside from your information being displayed rather than that of the TDSB.
Creating your First Form
By now you have created a new blank form. We are going to be creating a very basic Student Information form to collect information.
Getting Started
What we will learn in this part:
- How to create a new form
- How to title a new form
- How to give the form a file name
- How to add a form description
- How to change question types
- How to create a short answer question
Step 1: Changing the Form Name
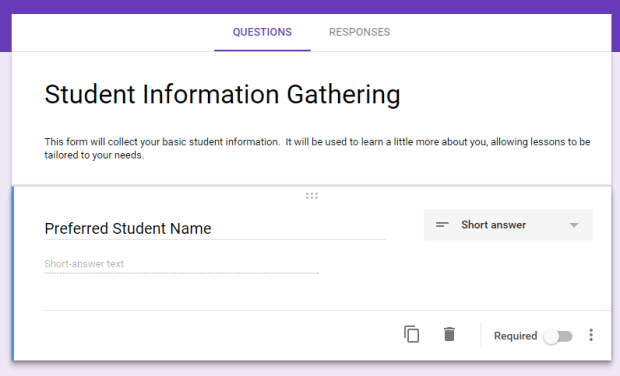
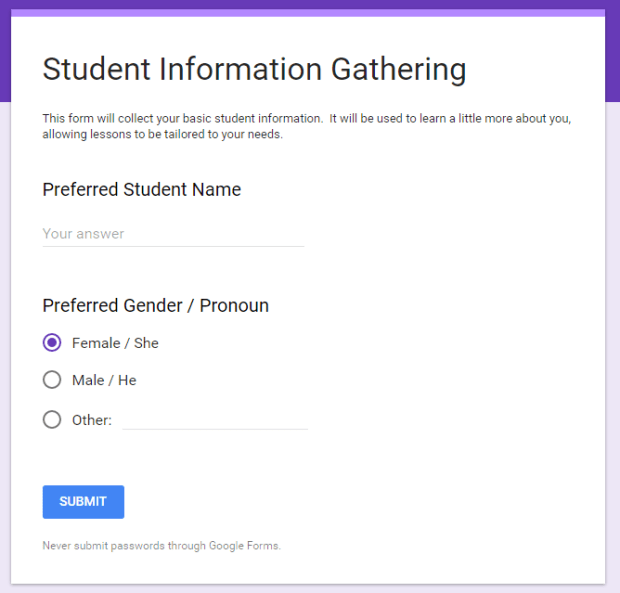
The first thing you’ll want to do is click on the Form Name, and change it from Untitled form to Student Information Gathering.
Step 2: Changing the File Name
Next you’ll want to change the file name. If you have not touched that part of the form yet, when you click on the file name Untitled form in the top left corner it should automatically switch to your new form name. If you have already clicked in that box you will need to name the form manually. Be sure to give it the same name as the Form Name.
Step 3: Adding a Description
It’s important to explain to people what the purpose of the form is. Even though it might be obvious to you, communicating that to the user is also important.
Beneath your new title, you will see the words “Form description”. Once you click on that, a purple (or a colour matching your form’s theme) indicator line will appear letting you know that you are editing the text in a specific section.
You may now type in a description of your form. For our purposes type the following:
This form will collect your basic student information. It will be used to learn a little more about you, allowing lessons to be tailored to your needs.
Step 4: Creating our First Question
By default Google Forms has already created your first question. Click on the words Untitled Question and rename it to Preferred Student Name.
You will notice that this is currently a multiple choice question. As you do not want to have to create all the options for various names, this is not a good question type to collect their name.
Click on the words Multiple Choice and open up the Question Type menu. Select Short Answer instead.
You have now created the first question for your form.
Previewing and Expanding
What we will learn in this section:
- How to preview a form
- How to view responses
- How to delete responses
- How to add a new question
- How to move questions
- How to add a multiple choice question
Step 5: Previewing Your Form
 Click on the Preview Button to open up your form and view it the way your users will. From here you can either close the new browser tab and return to editing your form, or you can fill out your form and submit it.
Please fill out your preferred name, and click submit. Note that once you click submit you will be told that your result has been recorded. Now, close this tab and return to the form editing screen.
Step 6: Looking at Basic Responses

Your form now has one response. By toggling to the response screen you can switch between a summary of all responses, and individual response pages.
Note: Currently Accepting Reponses is toggled on. If you wish to stop allowing form submissions simply toggle this to the off position. For now, we will just leave it alone.
Because this response isn’t very useful to us, you will want to delete it. To do so, click on Individual so that you are viewing the reponse with your name on it. Then click on the trashcan icon.
Step 7: Adding a New Question
Return to the Questions section, to continue editing your form. You can view results later by returning to the Results screen.
 On the Insert Options bar, click the Add Question button. It will add a new question directly below the currently selected question.
Step 8: Moving a Question
You may notice that you did not have a selected question, and so the new question appeared at the top of your form. Since we want the new question to appear after the preferred name question you have two options. You could delete the new question, select the preferred name question, and then add a new question again… or you could click on the question movement tab and drag the question to its desired location.
 Moving questions is important, as you will later move other parts of your form the same way. Click on the movement tab now, and drag the question a few times until you feel comfortable.
Note: If you can’t find it, the move questions tab is represented by the six dots at the top middle of each question. They will appear on the currently selected question, as well as appear on any question you hover over with the mouse.
Step 9: Creating a Multiple Choice Question
Rename this question to Preferred Gender / Pronoun.
This time multiple choice is a great fit for our question type. Click on Option 1 and rename it to Female / She. Next, click on the words Add Option to add a new option. Rename Option 2 to Male / He.
Note: If you accidentally create an unnecessary option, simply click the X to the right of the question to delete it.
You may also notice a six dotted move tab appears to the right of the options. You can click on it to move the options into whatever order you prefer.
Finally, understanding that gender is a spectrum you will need to click on ADD “OTHER” which will create a third option, allowing students to fill in their preferred gender / pronoun if it is not found in the choice above.
Step 10: Previewing a Multiple Choice Question
Once more, click on the preview button. Click on the three options under Preferred Gender. Note how you can only choose one of the three options, and that if you choose Other a space will open up for you to write in your own answer.
Finishing your First Form
What we will learn in this section:
- How to add a Check Box question
- How to add a question description
- How to add a Paragraph question
- How to copy a question
- How to make a question a required response
- How to share your form
Step 11: Adding a Check Box Question
Add a new question under Preferred Gender and change it to Checkbox. This is similar to multiple choice, but it will allow users to select more than one response.
Change the question name to Access to Technology. Add the following options:
Home internet
Device that can take digital pictures
Device that can record digital video
Twitter Account
Google Account
Other
Note: Instead of clicking “Add option” each time, you can simply press [ENTER] once you have typed in a response, to begin adding a new response.
Step 12: Adding a Question Description
The previous question might be confusing for users. Are they clicking that they know about, what they have, what they want? You can clarify this by adding a question description.
 To do this, click on the question options menu in the bottom right of your question. Then click on description. This will create a new section under your question name. There, you can add text to clarify the question. Add the following description:
Please check the box beside each item you have access to.
Step 13: Creating a Paragraph Answer
Create a new question and change it to a Paragraph type. Name the question: What is something your teacher should know about you?
Step 14: Copying a question
 We will now create our fifth and final question. It will also be a paragraph question. Rather than creating a new question, and changing the type to paragraph, simply click on the copy question button.
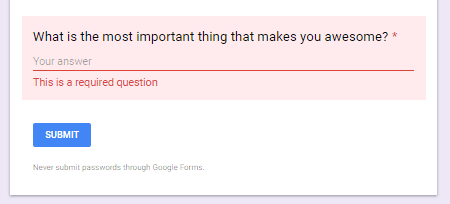
You will now have an exact copy of your previous question. Rename this one to What is the most important thing that makes you awesome?
Step 15: Making a Question Required
Students often have a hard time explaining good things about themselves. But it’s important for you to know – and for them to know – what makes them so amazing. So, rather than allowing them an easy way out, leaving this question blank, we are going to make answering it a requirement.
 To make a question required, simply click on the required toggle, ensuring that the circle is flipped to the right. Any question you mark as such must be answered before users will be allowed to submit their response.
Step 16: Open the Sharing Screen
You now have a finished Google Form! That’s amazing! I have no doubt that you’ll be able to create all sorts of interesting forms now. But to be valuable, you’ll need to share them with others.
 There are two main ways to do that – each way starts by clicking on the Share button at the top of the screen.
This will open up the Send form screen.
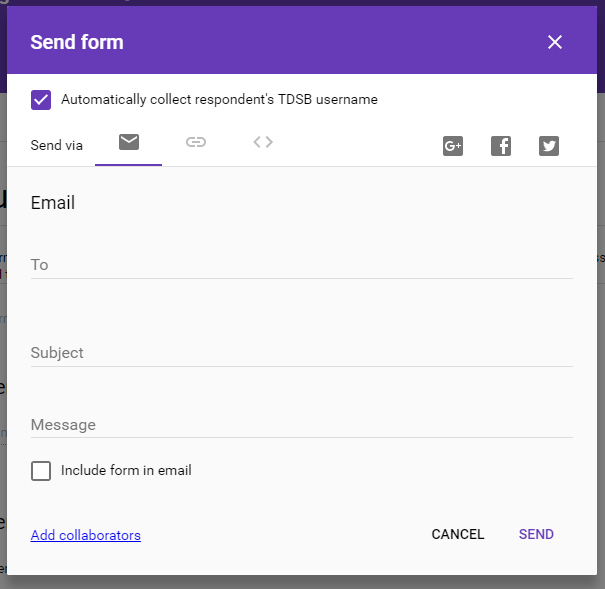
The first thing I recommend you do is check Automatically collect respondent’s TDSB username. This will ensure that you know who submitted the response, correlating it with their TDSB e-mail address.
If you want this form to be useable for people without a TDSB account, simply uncheck: 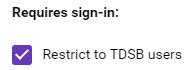
Restrict to TDSB users in the Form Settings.
Step 17: Sharing your Form
You now have two main options to share your form. You can manually type in the e-mail addresses of each person you want to send the form to. You can also add a “Subject line” and “message” that will appear when they are e-mailed the form.
Another way to share the form with users is to click on the link tab, next to Send via.

From here you can copy the link (shortening it if you want) and simply paste that link to your Google Classroom, in an e-mail, through a social media platform, or any other way you can think of.
Step 18: Congratulate Yourself!
That’s it. You’re done. You can send your form out into the wild now to gain feedback. If you’d like, you might want to change or add a few more questions. Once you’ve done that, you can use this basic form with your own students!
Next Steps
In our Next Part we will learn how to create a more advanced Google Form.

Oh my goodness! Amazing article dude! Thanks, However I am going through problems
with your RSS. I don’t know why I cannot join it.
Is there anybody getting similar RSS problems? Anyone who
knows the answer can you kindly respond? Thanks!!
LikeLike
It’s amazing in support of me to have a site, which is beneficial designed for my know-how.
thanks admin
LikeLike