
In the last part you learned how to make an Advanced Google Form. Now that you know how to create a number of different types of forms, you will be putting those skills to use in an effort to make your life easier. If you have not read the previous chapters, please familiarize yourself with that material, as terms and concepts will be referred to in the creation of our next Google Form. It is important to know that Google Forms can be used to make both self-marking and manual-marking quizzes. Their ability to give students immediate feedback makes them excellent teaching tools.
Creating a Google Forms Quiz
Before we create a self-marking quiz it is important to understand the differences between quiz forms and the Google Forms we have looked at up to this point. Once you are comfortable with the ideas and concepts of creating a Google Forms Quiz, you will have no problem making a self-marking quiz.
Creating a Basic Quiz
What we will learn in this section:
- We will be reviewing and putting into practice all the skills learned to this point.
Step 1: Setting Up the Questions
Create a new blank form and:
- Change the title and filename to “Gendered Lego Quiz”.
- Write a Form description that reads “This quiz will test your understanding of the tropes and stereotypes present in the marketing of Lego sets.”
- Add a title that reads “Part 1: Marketing Images”
- Move the title to the top of your form.
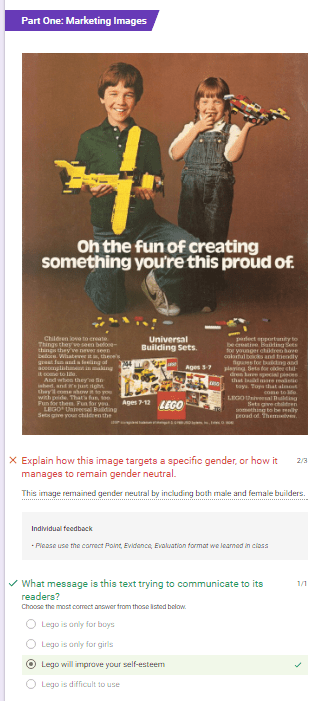
- In your web-browser search google images for “Lego Advertisement” (you need to search in your web browser, because the integrated image search only looks for images that are licenced for commercial use without alteration).
- Locate this image, right-click on it and “Copy Image Address” – then, paste the URL, and add it to your form:

- Under the image add the following questions:
- [Paragraph] Explain how this image targets a specific gender, or how it manages to remain gender neutral.
- [Multiple Choice] What message is this text trying to communicate to its readers?
- Write a description that reads “Choose the most correct answer from those listed below.”
- Add the options:
- Lego is only for boys
- Lego is only for girls
- Lego will improve your self-esteem
- Lego is difficult to use
- Add a new Title that reads “Feminist Frequency”
- Add a Title Description that reads “Watch the following clip and answer the questions below.”
- Add the video “Feminist Frequency Lego & Gender Part 1”
- Increase the size of the video to fill the width of your form.
- Under the video add the following questions:
- [Checkboxes] What positive benefits has research consistently shown playing with Lego leads to?
- Write a description that reads “Choose the two most correct answers.”
- Add the options:
- Lego is a gateway for math, science, and engineering fields
- Lego will make you more popular at recess
- Lego will give you a better understanding of pop culture trends
- Lego accelerates childhood development
- Set the data validation to “Select exactly 2”
- [Multiple Choice] What colours does the new Lego Friends line use to target girls?
- Add the options:
- Pink and Gold
- Pink and Green
- Pink and Purple
- Purple and Blue
- Create a new section
- Title the new section “Lego on Television”
- Create a new title that reads “Lego Friends”
- Add the video “Lego Friends Dolphin Cruise”
- Add the following Questions:
- [Paragraph] Explain how this video targets a specific gender, or how it manages to remain gender neutral.
- [Multiple Choice] Which character is not one of the main Lego Friends?
- Add the options:
- Mia
- Emma
- Olivia
- Andrea
- Sandra
- Stephanie
- Add the options:
- Add the options:
- [Checkboxes] What positive benefits has research consistently shown playing with Lego leads to?
Turning a Quiz into a Google Form Quiz
What we will learn in this section:
- How to turn a Form into a Quiz
- How to understand the Quiz options
- How to assign points (grade) to a question
- How to assign correct answers to a question
- How to add specific question feedback
Step 2: Making the Form a Quiz
Now that you have a form set up, with multiple sections, images, videos, and titles, it’s time to turn it into a quiz. While you could just allow students to fill out the form, as normal, and check their answers in the results page – keeping track of their grades on a separate sheet of paper, there is a more integrated way to use the Quiz functionality of Google Forms.
 First, click on the settings icon at the top of the screen. Next, select the Quiz tab and toggle the option “Make this a quiz” to on.

Step 3: Understanding the Quiz Options
You will be presented with a number of options. They may seem confusing and overwhelming at first, but after a moment’s pause to take them in you will realize they’re quite straight forward.
Release Grade has two options. If you select “Immediately” then students will be given their grade as soon as they complete their quiz. This is useful if the quiz is all multiple choice, and you want to ensure students are aware of corrections straight away.
If you were creating a quiz that tested students’ knowledge on a new digital literacy tool, immediate feedback is excellent as the user can correct themselves straight away.
“Later” allows you to go through all of the results before you students are informed of their marks. We will need to select this option as we have Paragraph Questions that will require manual marking.
Ensure that you have selected the Radio Button beside Later, after manual review.
 Note that if you hover the mouse cursor over the help icon it will explain what the other options do. I would recommend keeping them checked.
Step 4: Assigning Grade Values
Now that you have turned your form into a quiz, you will notice that every question has a new option. Click on the first question, “Explain how this image targets a specific gender, or how it manages to remain gender neutral.”
You will notice at the bottom of the question there is a new option: ANSWER KEY.
![]()
Click ANSWER KEY to access the Feedback and Points screen.

From this screen you can assign the amount of points this question will be worth. For our purposes we will assign the paragraph questions 3 points each.
Assign the multiple choice and checkbox questions 1 point each.
This will give us a quiz that has a total score of 10.
Assign these points now, by clicking on the individual questions and entering the correct point value.
Step 5: Assign Correct Answers
While we haven’t reached the stage where google can mark paragraph responses… yet – we are at the stage where it can quickly mark your multiple choice and checkbox questions.
All you have to do is tell the Quiz what the correct answers are.
You may have noticed when setting point values that you can also set the correct answers. Doing so is simple. Just return to the questions, and click the correct answer on the ANSWER KEY screen.

Note: Should you wish, you can assign multiple correct answers.

For the Checkbox question, it is important that all correct answers are selected.
Step 6: Adding Specific Feedback
When you hand back the quiz through the results screen, students will be made aware of the correct answers for multiple choice questions. However, if you want more specific feedback that is returned – depending on if the answer was correct or incorrect – you can add it from the ANSWER KEY screen.
Simply click on ADD ANSWER FEEDBACK.

Select the question Which character is not one of the main Lego Friends?
And Add feedback for INCORRECT ANSWERS:
It’s understandable that you thought Stephanie was not one of the Lego friends, as she is the only one whose name does not end with “A”, however, the correct answer (Sandra) can be discovered by watching the introduction scene.
Note that you can also include a weblink that might direct the user to information that would help reinforce the graded skill.
Note: You might also find it helpful to include feedback to the paragraph answers. You might include remarks such as:
- Ensure you use correct spelling and grammar
- Please use the correct Point, Evidence, Evaluation format we learned in class
- Use specific details from the text to support your answers
By doing this, when you are reviewing and marking the quiz you can delete skills users successfully demonstrated, while leaving comments to remind them of their areas of need. This will prevent you from needing to re-write similar comments time and time again.
Step 7: Preview your quiz, and Submit
Now that your quiz is fully set up with questions, grades, and correct answers you are ready to deploy it into the wild. However, before you do take a moment to answer it yourself. This will allow you to ensure everything is working as expected.
Reviewing and Grading a Quiz
What we will learn in this section:
- How to turn a Form into a Quiz
- How to understand the Quiz options
- How to assign points (grade) to a question
- How to assign correct answers to a question
- How to add specific question feedback
- How to grade a quiz
- How to release graded quizzes
Step 8: Reviewing the Quiz Response Summary
Having run through the quiz, yourself, you will have one response to assess. Toggle your quiz to the RESPONSE screen.
You will be greeted with a summary of results. Note that only the automatically graded questions will be marked at this time.

Step 9: Reviewing Individual Results
The meaningful section of the results screen is the individual results pages. Use the toggle to select individual results.

Note that you can now view the entire quiz on one scrolling page. You can see both correct and incorrect questions marked with checks and Xs.
Beside each question, you will also notice a grade out of the total available points.
Correct choices will be displayed next to incorrect answers, and if you have assigned specific feedback that will also be provided in the individual results.

Note: Should you wish, you can override the automatically assigned grade, as well as the automatic feedback.
Step 10: Marking Written Responses
As we know, written responses cannot be marked automatically. However, the answers students wrote will be displayed under the question – just as they are with multiple choice questions.

 From this screen you can assign a grade using the points selector to the right of the question.
You can also click on ADD INDIVIDUAL FEEDBACK which will open up a screen to write a specific response. If you added feedback while making the quiz, that will be displayed. You can add or remove anything you wish from these comments.
These will only be displayed to the user who wrote the answer you are currently grading.

Step 11: Saving a Marked Quiz
When you have finished assigning grades to an individual user, it is imperative that you click the SAVE button at the bottom of the screen.

Due to the nature of technology, I advise that you save often throughout the marking process – especially if you have written a number of detailed notes in response to a written answer.
Step 12: Marking the Next Response
You can use the response selector at the top of each individualized response to navigate through each user’s quiz.
![]()
Note that their e-mail address is recorded, indicating who wrote the response. You also have the option to delete, or print a hard copy, of their response.
Once you have selected a new response, simply repeat the grading process.
Step 13: Reviewing the Summary Screen Again
Now that you have marked each quiz, you will notice that the results in the summary screen are far more valuable. Use them to assess your practice.
Step 14: Returning Results
You can return results from either the Individual Result screen or the summary screen. To do so click the RELEASE SCORES button.
On the Summary screen this button can be found above the scores summary:
![]()
On the indivudal Results screen this button can be found on the individual results bar at the top:
![]()
Once you have clicked on the button you will be able to select some, or all, of the results to return. Select the results you wish to return by checking the box next to the users’ email addresses.
You can also add a message that will be included with the results. I suggest you add
“Please find, attached, the results from your quiz. If you have any questions about your grade, feel free to contact me.”

Once you have added the message click SEND EMAILS AND RELEASE.
Step 15: Results E-Mail
It’s important to know what students will see when they have a quiz returned to them. In their e-mail they will see their final grade, and be prompted with a button to view the results.

When they click on the VIEW button they will see a screen similar to what you saw when you were marking their responses. The only difference is they will not be able to edit their grade, or comments.
Note: If you selected “Release Grade Immediately” students could view this screen directly after submission.
Step 16: Congratulate Yourself; Take a Break
You’re now a master of Google Forms. You can mark complex forms, and create self-grading quizzes. You’re amazing!
Next Steps
In our Next Part we will discover that there’s always more to learn.

Thanks this is brilliant
LikeLike