

Twine 2 is a piece of software that allows you to create Choose Our Way tales. In our last parts you learned about palm stories, familiarized yourself with the basics of choose our way tales, and then learned how to write basic choose our way tales. Now we’ll look at how to digitize those tales using Twine 2.
Examples of apps made using this method can be found at: Sammi’s Quest: Google Play Store
A Free Demo can be downloaded to your Android Device Here: Sammi’s Quest: Vol. 1 – The Wandering Ogres (Demo)
The Full Version can be purchased for your Android Device Here: Sammi’s Quest: Vol. 1 – The Wandering Ogres (Full Release)
The Basics of Twine 2
First, direct your browser to https://twinery.org/2/
If you’ve never used Twine 2 before, it will redirect you to https://twinery.org/2/#!/welcome I suggest you click on tell me more and step through the information presented there. The most important thing to remember is how Twine 2 saves your files.
How Twine 2 Saves Your Files
Twine 2 saves stories to the browser cache. This means that you don’t need to log into an account to use it. However, it also means that the stories you write on one computer will not be available on another computer unless you manually save it.
Saving the story is simple. Either click on the cog image or the story name and select “Publish to File”. This will save your file your story as an HTML file which can be saved to cloud storage, a network drive, or USB key.
You can copy this HTML file to another computer, and load it by using the “Import From File” option.
Writing with Twine 2
Twine 2 creates one page as a default option. You can write in that page as you would anything else, however, the difference between linear stories and Choose Our Way tales comes when you add branching options.
[[Writing text in brackets]] creates links to new pages.
Example:
Page Name: Untitled Passage
Once upon a time there was a boy who went to the beach.
[[He built a sand castle]]
[[He ran into the water]]
This will create two new pages, one named “He built a sand castle” and another called “He ran into the water”.
From there, you can create more branching choices, or connect them back to one another.
Example:
Page Name: He built a sand castle
The boy made the greatest sand castle anyone had ever seen. After it was complete…
[[He ran into the water]]
[[He rewound time and went into the past|Untitled Passage]]
The following link [[He rewound time and went into the past|Untitled Passage]] allows you to create a link that has text that says one thing “He rewound time and went into the past” that links to a different page “Untitled Passage” (To the left of the | is the text, and to the right is the page link.)
This story can end by simply not having any branching choices in on your final page. While this example story will only have one ending, you should feel free to create multiple endings in your work.
Example:
Page Name: He ran into the water
As he was splashing around in the water he looked up in the sky. A great ship sailed above him through a sea of clouds. It was at that moment that the boy woke up.
The end.
Let’s not kid ourselves, it’s not a great story – but it’s a story that allowed for some reader participation. It’s an acceptable place to start.
Further Reading
You can find additonal information for writing Twine 2 stories at the following links:
A Total Beginners Guide to Twine 2.1
Lesson 4: Your First Twine 2 Story
Before you write your first Twine 2 story, you will need to create an outline for your story. This lesson will build from the framework created by running the Palm Story Lesson.
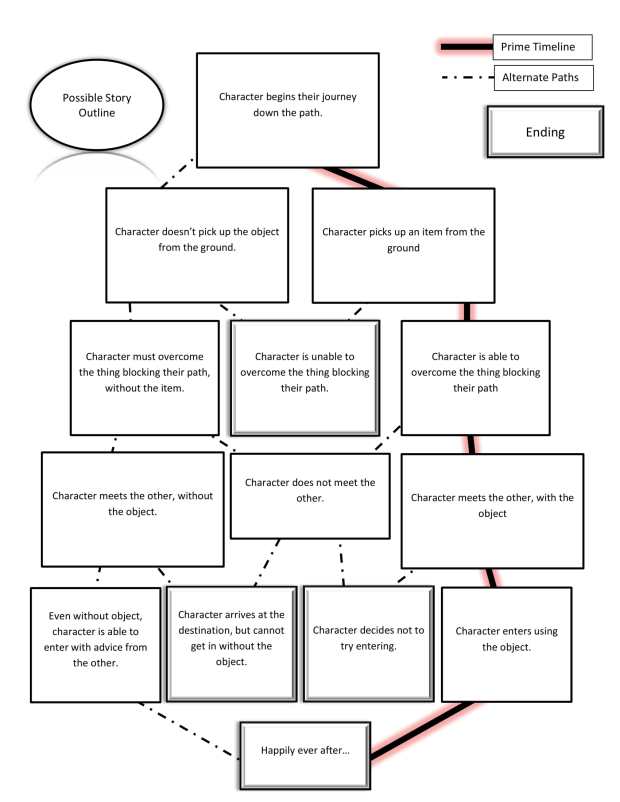
Twine 2 Story Outline
Once your students have completed the Palm Story, your students should create a Twine 2 story using the following flowchart pathways.
Twine 2 Story Example
An example of a complete Twine 2 story, based on the outline created from running the Palm Story Lesson can be seen below.

The above example has multiple endings, and a number of pages where readers can choose which direction they’d like their character to head. With this story, the reader has agency to become a fully realized active participant in the narrative.
Sharing a Twine 2 Story
Once the story is complete, it can be hosted on philome.la which will allow students to share their story with anyone who has an internet connection. The only requirement for uploading a story to philome.la is a twitter account, which can be created using a school or personal e-mail address.
The Twine 2 Assignments
You have been learned how to write with Twine 2, as well as how to create a branching story using a flow chart outline. Now you’ll need to decide if you want your students to create a short story using the program.
Short Story Assignment
First use the Palm Story Lesson for the ideation stage of planning. It will prepare the students for this assignment.
Requirements:
- Be between 500 and 1250 words
- Have at least three endings
- Have at least five pages where the reader can choose a direction
Handout: Twine 2 Short Story Assignment
Student Examples
Next Steps
Now that you have familiarized yourself with Twine 2, and have learned how to have your students write a short COWtale in your class, you can move on and see how to write a longer story, as well as how to convert that story to an Android APK file that can be played on compatible phones or tablets.
