

In the last part (Pixton in the Classroom) we learned how to set up our Pixton account. Now we will look at how we can customize our assignments and work with our digital classrooms.
Creating Your First Activity 
From the Activity screen for your class, click on the +NEW ACTIVITY button.
From here you can choose to Import from Lesson Plan or Create from Scratch. For our purposes we are going to Create from Scratch. We will look at using lesson plans later in this assignment.
Creating an Assignment From Scratch
 Two of the fields are mandatory – the Activity Title, and the Due Date.
- Title your assignment “Your First Comic”
- In the instructions write the following:
You will be creating your first comic in Pixton and submitting it to ensure you are familiar with the program. You can use the comic you created in the tutorial to fulfill this assignment. - Create a suitable due date
- Determine if you want other educators to view your assignment – if so, make sure the Sharing box is checked.
- Select the Group you want to assign the task to. As you only have one group right now, assign it to that class.
There is the option to attaching a comic you have already created to the assignment. This might serve as an exemplar demonstrating what the students need to complete.
Once you have finished creating your comic you can click SAVE & ASSIGN TO GROUP.
You now have a class set up, with their first assignment ready to go. If only you had some students to complete the task!
Adding Students to Your Group
- Navigate back to the Group Page by clicking on the Main Menu / My People / Groups.
- Click on the House button for your group to view the group’s main page
- Click +ADD PEOPLE
You will be presented with two options, Let me do it, and Give them a link.
For your ease, and also as it fits the Pixton – Student Guide – select Give them a link.
You will then see weblinks for all the groups that you have created. The link will be formatted as follows:
Pixton.com/a/####-##
Record the ####-## on the Student Guide. This will allow the students to join your class Group.
You will now have a fully set up Pixton account, with a class group, and students. Feel free to create as many groups as you like. I would recommend one group for each class you use Pixton with.
Before you are considered proficient Pixton Users, ready to embrace the graphic novel creation software, we will look at two more things: Changing Passwords when your students forget them, and Using Lesson Plans.
Changing Passwords
Click on Main Menu, then select Students. This will take you to the students overview page.
There are three tabs at the top – Students, Students by Group, and Profile Gallery. Ensure that the Students tab is selected. You will see the following information, based on your individual students:
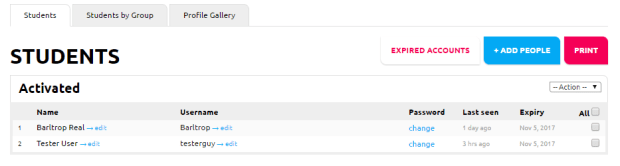
Note that there is a column titled Password. By selecting the change option for the appropriate student, you will be able to change their password to something they can use to access their account.
You can also deactivate accounts here, if students do not enter their name, or username, to your specifications. Check the box on the right for the users you want to deactivate, then select the —Action– drop down menu, and select deactivate.
Next Steps
In the next part we will learn how to use the built in Pixton lessons plans, reducing prep time while offering examples to help spurn your creativity.
Part 1: Pixton Comic Creator for Teachers
Part 2: Pixton in the Classroom
Part 3: Assignments and Students in Pixton
Part 4: Using Lesson Plans in Pixton
Part 5: Pixton – Downloadable Resources
